And there is a Raspberry Pi PiKrellCam forum
Setup->Preset->Settings->Zoom_Percent.
Setup->Config->Settings->Preview_Stall_Warning.
Version 4.3.1 - video_mp4box_fps can be fractional. For audio/video drift tuning.
Version 4.3.0
Removed motion_preview_save_mode. Preview/thumb now always saved as "first".
Version 4.2.1 - Changes for Pi 4 peripheral base and Buster installs.
Version 4.2.0
Moved Setup->Config->Times/* and Setup->Settings->Startup_Motion to Setup->Config->Motion.
Archive Calendar can view by year.
Updated scripts-dist/startup script has NFS archive mounting.
New scripts-dist/example-motion-events demo of processing
The motion trigger FIFO command can encode for user defined trigger type (PIR, laser, etc). Previously web page showed "Extern" for videos with only a FIFO trigger, but now shows either "FIFO" or the user defined trigger type string.
This help section describes Media Types
Fix 2 channel audio recording bug.
Version 4.1.0
Disk free percent checking for stills/timelapse.
pikrellcam.conf: on_manual_end on_loop_end on_motion_enable.
Stills have a thumbs view.
cd /home/pi
git clone https://github.com/billw2/pikrellcam.git
cd pikrellcam
./install-pikrellcam.sh
The install-pikrellcam.sh script installs needed packages and prompts for three things to configure:
- Port number for the nginx web server
to listen on. The default is 80, but an alternate non standard port number can
be used in which case the PiKrellCam web page would be accessed with the URL:
http://your_pi:port_number - Auto start: if enabled a line will be added to /etc/rc.local so that pikrellcam will be auto started at boot. If this is not enabled, pikrellcam will need to be started from the web page or from a terminal after each boot.
- Password protection: if set a login will be required to access the PiKrellCam web pages.
First Usage
http://your_pi:port_number
- Expand the
System panel and start the PiKrellCam prgram
by clicking the button
Start
After two or three seconds (startup can be slower on a Pi 1), the preview image from the camera should appear. If it does not you should get in its place an error image indicating that the camera could not be started. This can happen if the camera is busy (another program is using it) or if there is a problem with the ribbon cable camera connection. If this happens, you should fix the issue with the camera and restart PiKrellCam. - After the preview image appears, turn on motion detection by clicking the button Enable: Motion
- The OSD then shows that motion detection is ON and PiKrellCam is now operating with its default settings.
- Wait for motion to be detected and watch the OSD for the video record progress.
After the video ends, view it by going to the Videos page by clicking: Media: Videos - On the button bar, click the buttons
Show:
Preset
Timelapse
Vectors
to toggle showing information PiKrellCam can display on the OSD. When you show Preset, you see the currently configured motion detection vector and burst values and the motion detect regions in effect. See below. - A basic first configuration to consider is enabling motion detection to be turned on
each time PiKrellCam is started. To do this, use the OSD menu system:
- Expand the Setup panel.
- In the Config group, click the button Settings
- The OSD will show a horizontal menu with Startup_Motion highlighted (underlined).
- Click the button: Sel
- Turn the option ON by clicking
- Finalize the startup motion new option setting by clicking: Sel
- Back out of the menu by clicking Back
After an upgrade to a new version PiKrellCam should be stopped and restarted from the System panel and the web pages should be reloaded to pick up any possible web page changes.
-
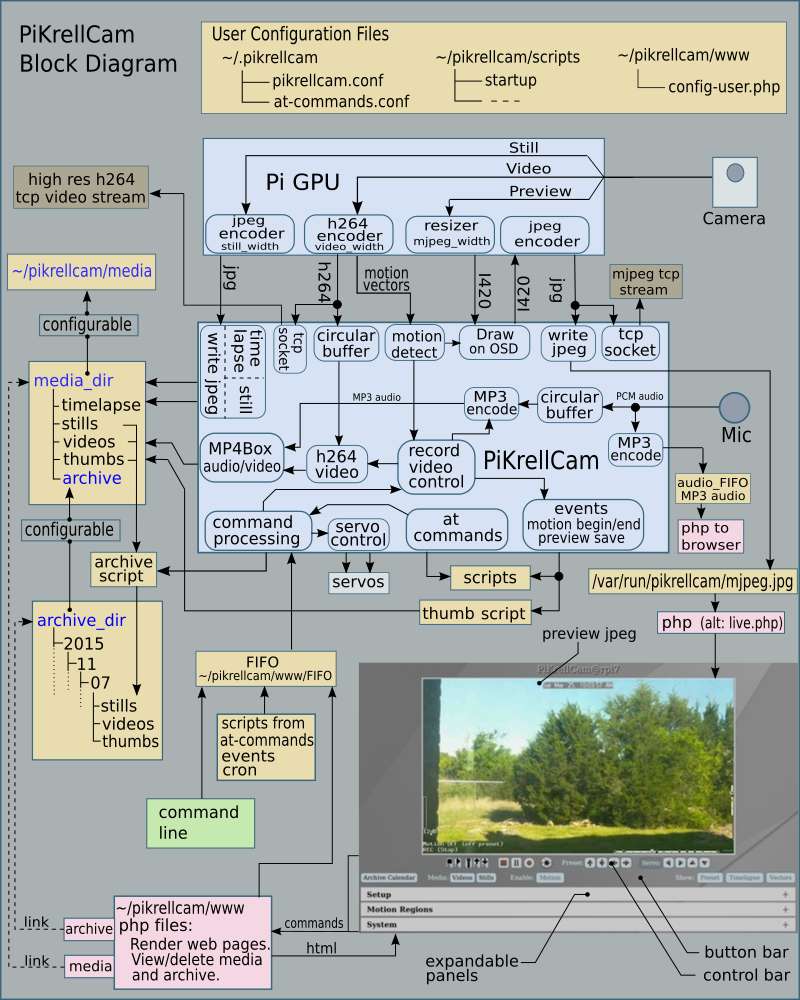
Pi GPU is the Pi video processor and its
components (encoders and resizer) run as threads separate from the
PiKrellCam program which runs on the Pi Arm
microprocessor.
- PiKrellCam runs as user pi for simplified install and other benefits
(but a default user other than pi is possible).
PHP files are run via the web server nginx and so run as the user www-data.
The install script created a
/etc/sudoers.d/pikrellcam file to give the user www-data permission to start pikrellcam as user pi from the web page. If the option to run pikrellcam at boot was selected, a line to start pikrellcam as user pi was added to/etc/rc.local - The install script creates /etc/nginx/sites-available/pikrellcam where listen port number and password protection for the web pages are configured.
- Several PiKrellCam internal control paths are not shown in the above diagram. The "command processing" block can control the video record, still, time lapse and other sub systems.
- A simple feed of the preview jpeg can be viewed without control panels or button/control bars.
Just point your browser to:
http://your_pi:port_num/live.php
or
http://pi:password@your_pi:port_num/live.php
where port_num is the nginx port configured in the install. If the port was left at the default 80, you can omit the :port_num from the URL. - An alternate way to view the preview is with a tcp stream connection which additionally
allows viewing using vlc or Android MJPEG viewer apps such as tinycam monitor, etc.
Open the MJPEG network stream using the URL:
http://pi:password@your_pi:port_num/mjpeg_stream.php - To be able to view the h264 tcp video stream some extra install and
setup are required. Follow the
rtsp live video setup instructions on the forum and you can view the stream with vlc. See also.
- Manual - videos are triggered by a record on|off command sent into the command FIFO (by script or clicking the web page video record button). The web page thumb will have a "Manual" label.
- Motion - videos have motion vector direction or burst detects. The web page thumb will have no extra label and the thumb image will be an image of the area of a motion detect.
-
FIFO - videos are motion videos triggered by a
motion trigger
command sent into the command FIFO and will have no motion
vector or burst detects. The web page
thumb will have a "FIFO" or "code" label where "code" is the optional
user supplied code string (for example PIR or laser) in the
motion trigger command. - Audio - videos are motion videos triggered by an audio trigger and will have no motion vector/burst detects or FIFO command triggers. The web page thumb will have an "Audio" label.
- Manual - stills are triggered by a still command sent into the command FIFO (by script or clicking the web page still snapshot button) and have no web page thumb extra label.
- Motion - stills are triggered by a motion vector or burst detect. The web page thumb will have a "Motion" label and a motion record event sequence number that is reset to 1 each day.
-
FIFO - stills are motion stills triggered by a
motion trigger
command sent into the command FIFO. The web page
thumb will have a "FIFO" or "code" label where "code" is the optional
user supplied code string (for example PIR or laser) in the
motion trigger command. - Audio - stills are motion stills triggered by an audio detect trigger and will have an "Audio" label on the web page thumb.
- Loop videos with no motion detect will end with _0.mp4.
- Loop videos with a motion vector or burst detect will end with _m.mp4 (previous versions used _1.mp4) and will have a "Motion" label on the web page thumb. The thumb image will be a motion detect area.
- Loop videos with motion externally triggered (a motion trigger command was sent into the FIFO) and no motion vector/burst detects will end with _e-ID.mp4 and will have a "ID" label on the web page thumb where "ID" is "FIFO" or the user defined ID string in the motion trigger command. The thumb image will be of the full preview image.
- Loop videos with an audio trigger and no motion vector detects or FIFO triggers will end with _a.mp4 and will have an "Audio" label on the web page thumb. The thumb image will be of the full preview image.
Motion Vector Direction Detects
After the motion region composite vectors are calculated, the component motion vectors are
filtered for direction and density. This provides high sensitivity and noise
immunity for small to medium sized objects. Motion detection is tested independently for
each motion region.
To adjust direction detects, set the
Vector_Magnitude and Vector_Count values using the OSD. The values should be set
lower in environments where small animal detection is desired or they can be
adjusted higher for moderate sized object detection. The combination of direction
filtering and density checks make this detection method resistant to
camera noise and is why it is good for small object detection.
However, when PiKrellCam detects
camera sparkle noise and the configured Vector_Count is low, the Vector_Count
does get a small dynamic adjustment higher to provide a noise safety margin.
Motion Vector Burst Detects
For large (or close) objects,
the individual camera motion vectors can have large direction distributions.
This is because individual vectors
in larger areas can begin to match pixels in
directions other than the overall object direction and direction detection can
sometimes miss these events.
So instead of using direction filtering, burst detection looks for a sudden
large increase in the number of motion vectors sustained over a number of frames.
This method uses the same region composite vectors as direction
detection, but it does not exclude vectors failing the direction test.
All region composite vectors are combined into an overall frame
composite vector. Motion burst detection is to compare the frame composite vector
count to the Burst_Count limit and to require at least one motion region
to pass a density test which is used to help reduce false detects of
the large noise counts the camera can generate in certain dim light situations.
The burst detect configurations Burst_Count and Burst_Frames are a
coarse adjustment for detection of relatively larger and faster moving
objects and they should be set according to what the noise environment
of the camera allows. For outdoor cameras this noise period occurs in the
minutes before sunrise and after sunset. For indoor cameras any noise
periods will depend on lighting conditions. Since burst detection does not
have the benefit of direction filtering to reduce noise, an
exponential moving average of background noise counts is calculated and
used to provide additional noise margin.
The compared to Burst_Count is dynamically adjusted higher by this average.
You can see the results of PiKrellCam's vector processing on the OSD by turning on the showing of Preset and Vectors. Watching this display will allow you to tune your configured vector limit values to your camera environment. To get a better look at the vectors, you can temporarily raise the mjpeg_divider value so the OSD will update more slowly.
Example Motion Detects
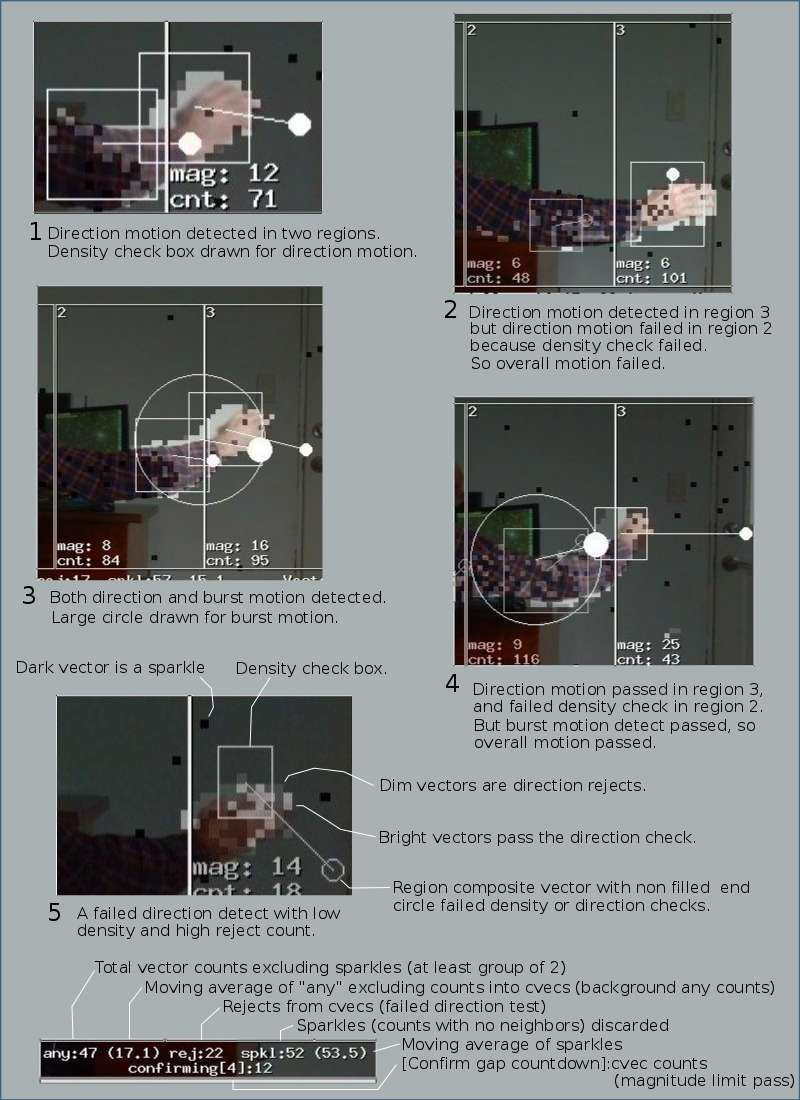
Notes:
- Image 2 fails the overall motion detect because PiKrellCam tries to be discriminating against noise. This is how it can run with very low magnitude and count limits and be good at detecting small animals. The low density distribution of vectors in region 2 that caused the failure can be typical of scenes with wind blown trees and grass.
- Image 4 shows a burst detect overriding a direction detect failure. The point to take from this is that if the burst count limit is set too low for a given camera environment, the burst detect method is likely to detect more noise than the direction detect method.
- Sparkles are camera motion vectors that have no neighbors and PiKrellCam considers them noise and excludes them from the composite vectors.
- The vector count status line will be shown if you set
Setup->Config->Settings->Vector_Counts on and Show: Preset.
Interpreting the vector count status line:- any:47 (17.1) This shows there was a frame total of 47 vectors excluding sparkles passing the magnitude limit test. So all of these vectors were clustered in a group of at least 2. The 17.1 count is an exponential moving average of the any count EXCLUDING any counts from a region when they were greater than the limit count. So the moving average measures background noise over sparkles. A burst count must exceed the average by the Burst_Count limit for a burst detect.
- rej:22 There were 22 total frame vectors that passed the magnitude limit count but failed the direction compare test to their region composite vector. They were excluded from any region final motion direction detect test. They were not excluded from the burst detect count test.
- spkl:52 (53.5) there were 52 vectors that passed the magnitude test but did not have any neighbors. So they were ecluded from any motion detect test. The sparkle moving average (53.5) is currently not used in motion detect testing.
- confirming[4]:12 there was a direction detect but a positive confirm gap is configured so there is a count down in progress waiting for a confirm motion detect. The :12 shows the current vector count being tested for a composite vector. If there was no countdown in progress, the line would have shown counts:12. The counts on this line show when vector counts are greater than the limit count and a region composite vector is being tested for motion.
- Most medium to large sized motion events can be detected by both the direction and burst methods. To help evaluate the effect of changing configuration values, look in the log file to find out which detect method (one or both) happened for a particular motion video.
- Hardware PWM: If servos are connected to
the hardware PWM GPIO pins, PiKrellCam can directly control the PWM signals and the
only configuration needed is to set in pikrellcam.conf
servo_pan_gpio and
servo_tilt_gpio
to the PWM GPIO pin numbers. So the pan/tilt or tilt/pan gpio pairs must be one of
12,13 12,19 18,13 18,19
Stop pikrellcam before editing ~/.pikrellcam/pikrellcam.conf to set the GPIO values. Then restart pikrellcam, reload the web page and you will have new buttons to control position presets and moving the servos. - ServoBlaster: If your servos are connected to
GPIOs that are not the hardware PWM pins you can use ServoBlaster.
Set
servo_pan_gpio and
servo_tilt_gpio
in pikrellcam.conf to the ServoBlaster servo numbers you are using and set
servo_use_servoblaster to
on.
For this a separate install of ServoBlaster is required according to ServoBlaster documentation.
Stop pikrellcam before editing ~/.pikrellcam/pikrellcam.conf to set the use servoblaster option and gpio values to ServoBlaster servo numbers. Then restart pikrellcam and reload the web page.
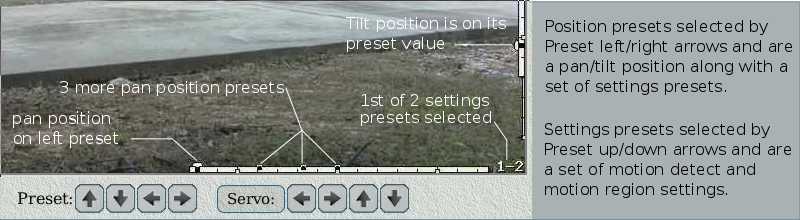
A preset is a camera position with a group of motion detect settings (vector magnitude / count and burst count / frames) and a set of motion regions. Clicking the preset up/down arrows moves to a new settings preset which single click loads a completely new set of motion detect settings and motion regions. So presets can be configured with motion detect sensitivities and motion regions appropriate for different weather or other conditions and quickly selected with single clicks.
Preset left/right arrow buttons are shown only if servos are configured and move the servos to configured position presets.
The Servo button and arrows are shown only if servos are enabled. Click the Servo button to cycle the servo arrow direction buttons through three modes: step by one, step by Move_Steps, and scan. When arrow buttons are in scan mode, clicking an arrow will step the servo continuously at Move_Step_msec rate until the arrow button is clicked again or the servo reaches a pan/tilt limit.
Preset behavior without servos:
- PiKrellCam considers the camera at a single fixed position and will never be off a preset. There will be only preset up/down arrows and no preset left/right or servo arrows. The pan/tilt graphics in the above image will not be shown.
- Any motion settings or regions edits will immediately apply to the currently selected settings preset (Preset up/down arrows).
- To create a new settings preset, click
Setup->Preset->New and a new settings preset will be created with the existing motion settings and regions which can then be edited.
- If
Setup->Config->Servo->Motion_Off_Preset is OFF, motion detection applies only if the servos are on a preset and if the servos are moved off a position preset with the servo arrow buttons then motion detection is put on hold. Set this option to ON if you want to have motion detected even if a servo position is off a preset. - Presets cannot be created with different tilt positions at the same pan position.
- When the servos are on a position preset, a new settings for the position
is created with
Setup->Preset->New - To create a preset at a new position:
- Move the servos to the desired position and click
Setup->Preset->New
and you can then edit the settings and motion regions for the preset.
Or you may move the servos off a preset and edit the settings or regions before creating the new preset and the OSD will warn you that you will need to create a new preset or else your edits will not be saved. If you move the servos back to an existing preset before creating a new one, your edits will be replaced with the preset settings. - Copy an existing set of settings from a position preset to a new preset at
a new position.
To do this, first move the servos to the existing preset you want to copy the settings from. Then, use the Servo arrows to move the camera to the new position (don't let the servo position fall on any other preset), and click
Setup->Preset->Copy
- Move the servos to the desired position and click
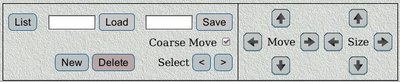
Motion regions outline areas of the camera view that will be sensitive to motion and provides for excluding from motion detection areas such as wind blown vegetation. Motion regions may be added, deleted, resized or moved at each preset. Motion regions may also be saved by name and this provides a way to maintain a set of motion regions as a backup or a temporary. For example, a backup motion region by name can be loaded as an initial condition after creating a new preset. Or temporary motion regions by name can be loaded if you have a set of different motion regions you want to load to a preset on demand for evaluation. If a motion region is loaded by name it is automatically saved to the current preset unless you have servos and are off a preset.
The increment of a region resize or move can be coarse or fine by selecting/deselecting the Coarse Move select button. When the increment is fine, the adjustment units are single motion vectors. Motion vectors are 16x16 pixel areas of the video so the motion vector array overlayed on the preview display for a 1080p video setting will be 120x68.
A single region can be expanded to cover any motion area of interest, but if the area is large relative to the total frame size, there is one advantage to splitting the area into more than one region. Each region is independently checked for direction motion and there is one composite vector per region. If there are two smaller separated objects moving in the region the composite vector for the region will have a center away from the two objects and the motion test can fail the density check. However, in practice this might not be an issue because the motions may be sporadic or otherwise not synchronous so motion is likely to be detected regardless. But if in doubt, go ahead and split areas into multiple regions. This is why the default motion regions configuration has four regions spanning the width of the motion frame.
This should usually not be an issue, but the size of a motion region should not be so small that it cannot hold the number of vectors that is set for the vector limit count. For example, if the limit count is set to 20 a small region of 10x6 size out of a total frame size of 120x68 will hold three times this limit and should be fine. A safe rule of thumb when limit counts are set higher would be to keep dimensions of motion regions not much smaller than 1/8 of the total frame dimensions.
Motion burst detection considers the total frame composite vector so the total area of all motion regions compared to the burst limit count is the factor to consider.
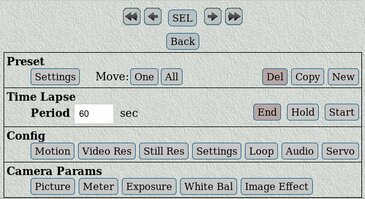
If servos are not configured, there will be no Move or Copy buttons in the Preset group and there will be no Servo button in the Config group.
Preset
- Settings
These values are part of a preset and editing them applies to the currently selected preset. If you have servos and are off a preset, editing these values can be done in anticipation of creating a new preset.- Vector_Magnitude - sets the minimum magnitude of a motion vector. Individual motion vector and region composite vector magnitudes less than this value will not be considered valid motion. Set the value lower to increase sensitivity to slower moving objects. Slow walking cats or people at a distance will probably require low settings of 7 or less while faster objects like cars or closer people can detect with higher settings. This value applies to composite vectors used for both direction and burst detects.
- Vector_Count - sets the minimum count of individual motion vectors required for a region composite vector. Set the value lower for increased sensitivity to direction detects of smaller moving objects. A value of 4 or 5 can detect small animals at moderate distances. A very low setting of 2 or 3 can detect small animals at greater distances, but with increased risk of false detects. For detecting people at medium distances or cars, the value can be set from 10 on up. Burst detects of larger objects have a separate count requirement.
- Burst_Count - sets the minimum count of individual motion vectors required for a frame composite vector burst detect. For a range of object sizes, burst detection will overlap direction detection and it may be difficult to observe the effect as this value is changed. If the camera view is noisy, the value probably should be adjusted higher, but if the view is normally quiet with well placed motion regions, the value can probably be left at a low value. For a detect, the total frame vector count must exceed the background count exponential moving average by the Burst_Count, and at least one motion region must pass a density test.
- Burst_Frames - sets the minimum number of frames of sustained burst counts required for a burst motion detect. Frames are checked at a video_fps/mjpeg_divider rate. The Pi camera will occasionally produce "glitches" of motion vectors which would generate many false detects if Burst_Frames was 1, so the minimum is 2. A value of 3 should filter out most glitches, but setting the value to 2 gives the fastest detects of large objects which may pass quickly through the camera field of view. Set the value higher to decrease detection of large objects passing quickly through the field of view.
- Zoom_Percent -
is the percent width and height of the camera sensor used for
imaging. Set the percent lower to digitally zoom in for videos
and stills. Moderate zooming can tune the camera field of view
at the expense of some resolution as fewer pixels may be used to
convert to stills or videos.
While viewing the web page preview, a larger zoom (lower percent
value) magnifies the pixels and is useful for camera focusing.
If a zoom value is selected, it is saved as part of the current preset along with the motion limit and motion region settings.
- Move: One
You will have this button only if servos are configured.
If the servos are moved off a preset, click this if you want to move the preset you were on to the current servo position. - Move: All
You will have this button only if servos are configured.
If the servos are moved off a preset, click this if you want to move the preset you were on to the current servo position and move all the other preset positions by the same amount. If the camera installation is disturbed or serviced, this allows a quick adjustment for restoring position presets. The other presets may still need small adjustments if servo positioning is non linear. All presets cannot be moved if the move would move any preset past a servo position limit. - Del
If servos are not configured or if the servo position is on an existing preset, delete the current Settings. If servos are configured and the servo position is on a preset and the Settings are the last Settings for the preset, then delete the position preset unless it is the only existing position preset. There must always be at least one preset and you cannot delete down to zero presets. - Copy
You will have this button only if servos are configured.
If the pan servo is moved off a preset, click this to create a new preset at the servo position which is initiallized by copying all of the preset settings (motion detect limits and regions) from the preset you were on into the new preset. - New
Creates a new preset. If servos are not configured or if the servo position is on an existing position preset, this will create a new Settings preset which can then be edited. If servos are configured and the servo position is not on an existing preset, then a new position preset is created with an initial single Settings.
Time Lapse
Config
Camera Params
If this option is
OFF,
the warning is still enabled when showing preset information
with the
Show: Preset button.
Connect an ALSA input capture device such as
USB sound card + microphone, USB mini microphone, or other which can
be recognized by running
arecord -l.
If arecord can record from the device and aplay play the wav file,
then pikrellcam should work using the same sound device. You may need to
run alsamixer to unmute the microphone input and set the capture level.
If you need more information than the basic setup listed here, the web
has many Pi microphone tutorials to look at.
So a microphone setup for PiKrellCam is:
-
The user pi
must be in the audio group.
Connect the USB sound card + microphone and the kernel should load the USB sound modules. Verify the sound card number using arecord. I get card 1 and use that for the remaining examples:pi@rpi2: ~$ arecord -l | grep USB card 1: Device [USB PnP Sound Device], device 0: USB Audio [USB Audio]
- Run alsamixer on card 1 and make sure the microphone input is
not muted. Probably set the input sensitivy high.
In alsamixer, press F4 to show controls
for the microphone capture input for the card.
pi@rpi2: ~$ alsamixer -c 1
-
For sound card 1, the ALSA hardware device is plughw:1.
Test that device by recording and playing an audio wav file:
  # Do a basic 5 second record:
pi@rpi2: ~$ arecord  -D plughw:1 -d 5  test.wav
  # And also check using parameters the same as pikrellcam recording defaults,
  # defaults are: device: plughw:1  channels: 1  rate: 24000 or 48000  16 bit audio.
arecord -D plughw:1 -d 5 -c 1 -f s16_LE -r 24000 test.wav
  # Play the sound:
pi@rpi2: ~$ aplay test.wav
- If the USB sound card is not plughw:1, edit audio_device in pikrellcam.conf to be the correct device and restart pikrellcam.
- Enable/disable audio recording is done by clicking the microphone audio control toggle button on the web page. An audio VU meter is drawn on the OSD when the microphone is successfully opened.
Audio Control Buttons
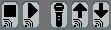 Web page audio control buttons are left to right:
- Audio Stream Stop - The OSD moving stream indicator will disappear.
- Audio Stream Play - If the microphone is open, PCM audio is encoded into MP3 audio which can be played by a browser (see Issues). When streaming is on, the OSD shows a moving streaming indicator under the VU meter and gain value.
- Microphone Toggle - Opens and closes the microphone. When the microphone is open, the OSD shows a vertical audio VU meter with the current gain value printed under it. With the microphone opened, audio is recorded with videos and can be streamed.
- Audio Gain Up - Increment the audio gain up to 30dB. This is not the gain set by alsamixer but is an additional amplication of the PCM sound data read from ALSA to help boost audio at the expense of amplified noise and risk of distortion from clipping.
- Audio Gain Down - Decrement the audio gain in dB to a minimum of 0dB (amplification factor is 1).
- audio_device - default: plughw:1
Sets the ALSA hardware audio input (microphone) capture device. - audio_rate_Pi2 - default: 48000
audio_rate_Pi1 - default: 24000
Audio sample rate used for a single core Pi and Pi model 2. Lame docs suggest using only MP3 supported sample rates:
8000 11025 12000 16000 22050 24000 32000 44100 48000
- audio_channels - default: 1
Set to 1 for mono or 2 for stereo. If using a common USB sound card that supports only one channel, setting 2 will be reverted to 1 when pikrellcam opens the microphone. - audio_mp3_quality_Pi2 - default: 2
audio_mp3_quality_Pi1 - default: 7
Value for quality of the lame lib encode of PCM to MP3 audio for a single core Pi and Pi model 2. Values range from 0 (best quality but very slow encode) to 9 (worst qualilty but fast encode). Lame docs say 2 is near best and not too slow and 7 is OK quality and a really fast encode.
Limitations & Issues
- Audio MP3 streaming works for me to Firefox but not to Chromium for some reason. Don't know if YMMV on this.
- FYI, sometimes clicking the microphone toggle button can fail to open the microphone because the device is busy, but clicking it some more eventually succeeds. Running arecord can similarly fail with device busy so it may be some issue with USB sound cards.
- If a video has out of sync audio, check the log to see if the actual video fps and audio rate was what is configured. If these are off, then data has been lost during the record. This is likely more a possible issue on a Pi1.
- Audio cannot be streamed to more than one web page at a time.
- ALSA audio capture devices cannot be opened by more than one application. If a microphone is needed for another purpose, it cannot also be open in pikrellcam.
Microphones

Noise is a possible issue when using sensitive omnidirectional microphones. A couple of likely causes are power line hum from the surrounding microphone environment or electrical noise getting into the USB sound card through the power supply. So microphone placement and a clean power supply can be important.
The default loop directory is under the ~/pikrellcam/media directory. This directory can be mounted with a dedicated loop file system and mounting can be done in fstab or in the pikrellcam startup script. Or a dedicated disk can be mounted to some other directory if the loop_dir value in pikrellcam.conf is edited to reference that location.
Loop video recording continuously wears flash disks, so if that is an issue, they can be enabled only for limited times of interest with commands sent to the FIFO:
echo "loop on" > ~/pikrellcam/www/FIFO
echo "loop off" > ~/pikrellcam/www/FIFO
echo "loop toggle" > ~/pikrellcam/www/FIFO
or commands in at-commands.conf like:
Mon-Fri 7:30   "@loop on"
Mon-Fri 9:30   "@loop off"
Oldest loop videos are automatically deleted to enforce both a configured maximum disk usage percent and configured minimum disk free percent with a priority on minimum disk free percent. The idea is to have a fixed maximum diskusage percent for loop videos and then media videos (manual and motion) and archived videos are allowed to grow until a minimum disk free percent remains if disk free checking is enabled for those videos.
Examples on the interactions of loop recording, setting disk percent limits and enabling disk free checking for motion videos:
- Media videos, archived videos and loop videos are all on the same mounted file system that is different from the SD card OS file system. If the Diskusage_Percent is set to say 50% and Diskfree_Percent is 10%, then there will be up to 40% of shared disk space available for media and archived videos. Setting Check_Archive_Diskfree ON has little to no effect because archiving is moving files within the same file system and not using more disk space.
- Media videos and loop videos are all on the same file system that is shared with the OS on a SD card where the OS uses about 1/2 of the space. If Diskusage_Percent is set to 25% and Diskfree_Percent is set to 10%, then up to 15% disk space will be available for media videos. Archiving has the same effect as above.
- Media videos, archive videos and loop videos are each on separate file systems (disks mounted and dedicated to each video type). If Diskfree_Percent is 10%, media videos can use up to 90% disk space, and Diskusage_Percent can be set high to 90% to use almost all of loop video disk space. In this case Check_Archive_Diskfree can be set ON and the oldest archived videos will be deleted to maintain a Diskfree_Percent minimum applied to the archive disk.
- mjpeg_width - has an initial default value of 640, but for most browser views this can be set higher to get a larger preview image. Values of 800 or 896 work OK. If this is changed, the motion_area_min_side value in pikrellcam.conf should be correspondingly scaled.
- video_motion_name_format
video_manual_name_format
video_timelapse_name_format
still_name_format - these file name formats are configurable with restrictions which are described in detail in pikrellcam.conf where they are configured. - motion_record_time_limit - This value limits the time in seconds of motion video recordings and can be set in seconds from 10 to 1800 (30 minutes) or set to zero for no record time limit. This time limit does not apply to manual recordings, but see the FIFO command examples for how to have a time limited manual record.
- Todo
~/.pikrellcam/at-commands.conf
~/pikrellcam/scripts/*
~/pikrellcam/www/config-user.php
- The image used for the web page background can be changed to another
PiKrellCam distribution image or to your custom background image you place
in the
~/pikrellcam/www/images directory. Any custom image name you create must begin with bg_ or else the image will be deleted by git when you do an upgrade. - Web page text colors can be changed. If the background is changed to a
darker image like images/passion.jpg the text
colors could be set brighter. For example, you could try these changes:
define("DEFAULT_TEXT_COLOR", "#ffffff"); define("SELECTED_TEXT_COLOR", "#500808"); define("MEDIA_TEXT_COLOR", "#0000EE"); define("MANUAL_VIDEO_TEXT_COLOR", "#085008"); define("LOG_TEXT_COLOR", "#ffffff"); define("BACKGROUND_IMAGE", "images/passion.jpg"); - The height of various scrolled views can be changed to match your normal browser size.
- Other options such as VIDEO_URL are not described here but are described in the file.
Each motion video will have a corresponding thumbnail jpeg stored in the thumbs sub directory. The motion video and its thumb are created, deleted or archived as a unit. The thumb jpegs are an image of motion extracted from the video and provide a quick view of what caused the motion video.
Media Directories
There are two links in the web page www directory
that pikrellcam uses to store and view media files and the defaults are:
pi@rpi2: ~$ ls -lt pikrellcam/www
total 116
lrwxrwxrwx 1 pi       www-data    33 Nov 16 09:07 archive -> /home/pi/pikrellcam/media/archive/
lrwxrwxrwx 1 pi       www-data    25 Nov 16 09:07 media -> /home/pi/pikrellcam/media/
The media link is the main media directory and its media file sub directories which contain a flat list of files where media files for all days are initially stored. Additionally, there is a timelapse and archive sub directory in the main media directory, but these are not a requirement of a media directory and the archive directory location is configurable.
So the initial default main media directory contains:
~/pikrellcam/media/videos
                  /stills
                  /thumbs
                  /timelapse
                  /archive
The default media links
can be configured in media_dir media archive_dir archiveWith this setup, all media files are stored on the Pi SD card. Media files may be configured to be stored on an external disk by editing the
MOUNT_DISK=sda1
This assumes there is a single USB disk plugged into the Pi and it appears as
Also, the mount point can be somewhere else in the filesystem. As an example, you want a VFAT disk to be mounted on /media/mountdir. For this, use absolute pathnames in pikrellcam.conf:
media_dir /media/mountdirIn the startup script, use a mount command like:
sudo mount -t vfat /dev/sda1 /media/mountdir -o rw,user,umask=0002or, if using fstab instead of the startup script, the entry should be like:
/dev/sda1 /media/mountdir vfat rw,user,umask=0002 0 0You can use dmask=0002,fmask=0002 in place of umask=0002.
If mounting a large CIFS filesystem the nounix,noserverino options may be needed in fstab so pikrellcam can make directories. Look at the example fstab entry forum raspberry pi forum
Archiving
By default, the archive directory is under the pikrellcam media directory and so is on the same file system. But archiving can be to either a separate disk mounted on the archive directory (as described above for mounting the media directory) or to another machine by network mounting on the archive directory. A network mount must have file system permissions set so that the pikrellcam installing user and www-data have read/write permissions from the Pi.
NFS Archiving Example 1
On gkrellm6 (Desktop running Linux - archiving to)
- In my home directory /home/bill, make an archive media directory
to be NFS mounted by the Pi:
$ cd
$ mkdir media-archive
- Give permission for this directory to be exported to all
other machines on my LAN by adding a line to /etc/exports:
/home/bill/media-archive 192.168.0.0/25(rw,nohide,no_subtree_check,no_root_squash)
After editing /etc/exports, restart nfs-kernel-server (/home/bill/media-archive must exist):$ sudo systemctl restart nfs-kernel-server
- Edit /etc/hosts so from my Pi I can refer to my gkrellm6 desktop
by name instead of IP address. The line I use for my network:
192.168.0.10 gkrellm6
-
For this example I will mount onto the default pikrellcam archive location
so I don't have to edit archive_dir in pikrellcam.conf. I leave it
at its default which assumes
/home/pi/pikrellcam/media/archive since there is no leading /:
archive_dir archive
-
Add a line to /etc/fstab so I can NFS mount the gkrellm6 media-archive
directory onto the pikrellcam archive directory. Use the archive_dir
full path implied by the archive_dir value above:
gkrellm6:/home/bill/media-archive /home/pi/pikrellcam/media/archive nfs users,noauto 0 0
- NFS mount the gkrellm6 media-archive directory by hand or by script.
The mount command will use the /etc/fstab line to mount the gkrellm6
/home/bill/media-archive directory on the pikrellcam/home/pi/pikrellcam/media/archive directory. After mounting, running df will show the NFS mount and reloading web pages will show "NFS Archive Calendar" buttons.$ sudo mount gkrellm6:/home/bill/media-archive
- You can use the pikrellcam ~/pikrellcam/scripts/startup script
to mount the NFS archive directory when pikrellcam starts.
Pikrellcam installs prior to V 4.1.5 did not have a NFS section in that
startup script so you may have to copy the new
~/pikrellcam/scripts-dist/startup over your existing~/pikrellcam/scripts/startup. and reconfigure MOUNT_DISK if you had previously done that.
Otherwise, configuration for NFS mounting must be as follows:- In ~/pikrellcam/scripts/startup, set NFS_ARCHIVE
to match the /etc/fstab nfs mount line:
NFS_ARCHIVE=gkrellm6:/home/bill/media-archive - In pikrellcam.conf, set the on_startup command. The $a variable
will be the archive_dir value configured in pikrellcam.conf and
will become the archive_dir value in the script:
on_startup $C/startup $I $m $a $G
- In ~/pikrellcam/scripts/startup, set NFS_ARCHIVE
to match the /etc/fstab nfs mount line:
NFS Archiving Example 2
On rpi0 (Desktop Pi3 - archiving to)
- Make /mnt/archive and partition 3 /mnt/archive/media-archive directories:
$ cd /mnt
$ sudo mkdir archive
$ sudo chown root.disk archive
$ sudo chmod 775 archive

# Mount partition 3 and make the media-archive subdirectory (my boot disk is sda).
$ sudo mount /dev/sda3 /mnt/archive
$ mkdir archive/media-archive
I want rpi0 partition 3 mounted at boot, so I have in /etc/fstab (I use PARTUUID in my fstab instead of sda for reliable mounting):PARTUUID=5d4064ac-01 /boot vfat defaults 0 2 PARTUUID=5d4064ac-02 / ext4 defaults,noatime,discard 0 1 PARTUUID=5d4064ac-03 /mnt/archive ext4 defaults,noatime,discard 0 2
- Give export permission for /mnt/archive/media-archive to all on the LAN.
Add to /etc/exports:
/mnt/archive/media-archive 192.168.0.0/25(rw,nohide,no_subtree_check,no_root_squash)
After editing /etc/exports, restart nfs-kernel-server (/mnt/archive/media-archive must exist):$ sudo systemctl restart nfs-kernel-server
- Edit /etc/hosts so from each Pi I can refer to my rpi0 desktop
by name instead of IP address. The line I use for my network:
192.168.0.30 rpi0
- I don't want the pikrellcam archive directory left at the default
location as
~/pikrellcam/media/archive because I have all my pikrellcam media directories mounted with USB disks and I would rather not NFS mount into a USB mount. So, I set up similary to the structure I set up for rpi0 and have each pikrellcam archive to directory /mnt/archive/media-archive which will be NFS mounted (but this could be a directory in /home/pi if you prefer not to put it in /mnt).$ cd /mnt $ sudo mkdir archive $ sudo chown root.disk archive $ sudo chmod 775 archive $ mkdir archive/media-archive
Stop pikrellcam and edit archive_dir in ~/.pikrellcam/pikrellcam.conf, then restart pikrellcam.archive_dir /mnt/archive/media-archive
- Edit /etc/fstab with a line for NFS mounting the rpi0
/mnt/archive/media-archive directory on the local/mnt/archive/media-archive directory. Add this line to /etc/fstab:rpi0:/mnt/archive/media-archive /mnt/archive/media-archive nfs users,noauto 0 0
- NFS mount the rpi0 media-archive directory by hand or by script.
The mount command will use the /etc/fstab line to mount the rpi0
/mnt/archive/media-archive directory on the/mnt/archive/media-archive directory of the Pis running pikrellcam:$ sudo mount rpi0:/mnt/archive/media-archive
- You can use the pikrellcam startup script to mount the NFS
directory as described in example 1. In this case:
- In ~/pikrellcam/scripts/startup, set NFS_ARCHIVE
to match the mounting directory in the /etc/fstab line:
NFS_ARCHIVE=rpi0:/mnt/archive/media-archive - In pikrellcam.conf, in addition to the archive_dir set as
above, set the on_startup command. The $a variable
will be the archive_dir value configured in pikrellcam.conf and
will become the archive_dir value in the script:
on_startup $C/startup $I $m $a $G
- In ~/pikrellcam/scripts/startup, set NFS_ARCHIVE
to match the mounting directory in the /etc/fstab line:
NFS Archiving Notes
- If the remote NFS server is slow to respond or down, a NFS mount command can appear to hang while the mount is retried.
- A non responding NFS server can cause the web pages to be slow to load until either the server responds or the local kernel temporarily gives up and lists the mount as "Stale". A stale or non responding NFS mount can be force unmounted with umnount -f or just wait until the remote file system comes back up.
archive/2017/11/13
or
archive/2017/07/04
Where 13 is a media directory for November 13. It has the media file sub directories videos, thumbs, and stills. When you archive files from the web page, the web server sends a command to pikrellcam to archive the files and the pikrellcam program does the archiving. Since pikrellcam runs as the user pi, pikrellcam has the sudo permission to create the appropriate directory structure for archiving. Since the web server runs as the user www-data, pikrellcam creates directories with write permission for the user www-data so files can be deleted from the web page. All directories in the archive path have permissions like:
pi@rpi2: ~/pikrellcam/www/archive$ ls -Rl
.:
total 0
drwxrwxr-x 3 pi www-data 60 Nov 12 12:16 2017/

./2017:
total 0
drwxrwxr-x 6 pi www-data 120 Nov 15 15:28 11/

./2017/11:
total 0
drwxrwxr-x 4 pi www-data 80 Nov 15 15:29 13/

./2017/11/13:
total 0
drwxrwxr-x 2 pi www-data 80 Nov 14 22:08 thumbs/
drwxrwxr-x 2 pi www-data 80 Nov 14 22:08 videos/
Keep these permissions in mind if you manage the directory structure outside of pikrellcam.
Archiving can be done by sending commands to the FIFO. For example, to archive all videos for Nov 13, 2017:
echo "archive_video day 2017-11-13" > ~/pikrellcam/www/FIFOor a specific video (including its thumb) can be archived with:
echo "archive_video motion_2017-11-05_14.46.14_456.mp4 2017-11-05" > ~/pikrellcam/www/FIFOTo archive all media videos for today or yesterday:
echo "archive_video day today" > ~/pikrellcam/www/FIFO
echo "archive_video day yesterday" > ~/pikrellcam/www/FIFO
To archive all loop videos for today or yesterday:
echo "archive_video day_loop today" > ~/pikrellcam/www/FIFO
echo "archive_video day_loop yesterday" > ~/pikrellcam/www/FIFO
Stills may be script archived using the same set of arguments with the archive_still FIFO command.
List of FIFO commands:
audio mic_open
audio mic_close
audio mic_toggle
audio gain [up|down|N]		# N: 0 - 30
audio stream_open
audio stream_close
audio_trigger_video [on|off]
audio_trigger_level N		# N: 2 - 100
box_MP3_only [on|off]
record on
record on pre_capture_time
record on pre_capture_time time_limit
record pause
record off
loop [on|off|toggle]
still
tl_start period
tl_end
tl_hold [on|off|toggle]
tl_show_status [on|off|toggle]
motion_enable [on|off|toggle]
motion_stills_enable [on|off|toggle]
motion_detects_fifo_enable [on|off|toggle]
motion limits magnitude count
motion burst count frames
motion trigger code    # code is digit N or N:ID    N is 0 or 1 and ID is a string (see Examples)
motion trigger code pre_capture time_limit
motion load_regions name
motion save_regions name
motion list_regions
motion show_regions [on|off|toggle]
motion show_vectors [on|off|toggle]
motion [command] - other commands sent by the web page to edit motion regions not
	intented for script or command line use.

preset prev_position
preset next_position
preset prev_settings
preset next_settings
preset goto position settings

zoom percent  - percent is 10-100

display [command] - commands sent by the web page to display OSD menus. Not intended for
	script or command line use.

tl_inform_convert
video_fps fps
video_bitrate bitrate
still_quality quality
video_mp4box_fps fps
inform "some string" row justify font xs ys
	echo inform \"Have a nice day.\" 3 3 1 > FIFO
	echo inform timeout 3
archive_video [day|day_loop|video.mp4] [today|yesterday|yyyy-mm-dd]
archive_still [day|video.mp4] [today|yesterday]yyyy-mm-dd]
annotate_text_background_color [none|rrggbb]   # rrggbb is hex color value 000000 - ffffff
annotate_text_brightness value   # value is integer 0 - 255, 255 default
annotate_text_size  value        # value is integer 6 - 160, 32 default
annotate_string [prepend|append] id string
annotate_string remove id
annotate_string spacechar c
fix_thumbs [fix|test]
delete_log
upgrade
quit
Examples
-
Motion detection
can be toggled on/off from the web page or with the FIFO command:
echo "motion_enable [on|off|toggle]" > ~/pikrellcam/www/FIFO
-
Still jpegs are created when a still command is sent to the FIFO.
echo "still" > ~/pikrellcam/www/FIFO"
- From the command line or a script, a manual video record can be managed with (a
record on after a record pause
resumes the existing record):
echo "record on" > ~/pikrellcam/www/FIFO
...
echo "record pause" > ~/pikrellcam/www/FIFO
...
echo "record on" > ~/pikrellcam/www/FIFO
...
echo "record off" > ~/pikrellcam/www/FIFO
- Start a manual record that will have up to 5 seconds of pre capture video.
The pre capture time is subject to what is available in the video circular
buffer, so if a record is started right after a previous manual or motion video
has ended there may not be asked for pre capture time available. Also the
pre capture time is limited by the size of the video circular buffer which is
a function of the greater of the motion detect Pre_Capture or Event_Gap times
plus a 4 second margin.
For example, if the Event_Gap is 10 seconds and Pre_Capture less than that,
a manual record pre capture time of up to 14 seconds is possible.
echo "record on 5" > ~/pikrellcam/www/FIFO
- Start a manual record that will have up to 10 seconds of pre capture video and
will have a maximum record time after the pre capture of 6 seconds. So the total
video will be 16 seconds long subject to pre capture time available in the video
circular buffer. The record time is wall time and does not consider pauses.
echo "record on 10 6" > ~/pikrellcam/www/FIFO
-
The motion trigger command is used to trigger a motion event from a script.
It has two usages and the first is
motion trigger code where code is a single digit N motion enable code or N:ID which adds a colon separated string to user identify the trigger type (PIR, laser interrupt, etc). If N is 0, the motion trigger is subject to the currently set motion enable. If N is 1, and the currently set motion enable is OFF, then force motion enable ON for this record event and recognize subsequent motion, external and audio triggers until the record event ends or there is a motion trigger command with N set to 0. If code is omitted, the currently set motion enable applies and the code ID defaults to "FIFO" (for just a generic FIFO trigger). The trigger code ID string is reported in the/run/pikrellcam/motion-events file so an on_motion_begin command can monitor for different external motion trigger types. See the filescripts-dist/example-motion-events.
This is a trigger event that works in parallel with motion direction, burst and audio detection and it uses all the configured motion times and on_motion commands. The event gap time applies, so any detects or triggers after an initial FIFO trigger can keep the record event going.
Externally trigger a video or a motion still with FIFO commands:# Use the motion enable currently set, if it is OFF, no video or still. echo "motion trigger" > ~/pikrellcam/www/FIFO" # Force motion enable on for this FIFO command, trigger a record even if motion_enable is OFF. # If there are no other motion direction or burst detects for a motion video, # the web page thumb will be labeled with "FIFO". # A motion still thumb will be labled with "FIFO". echo "motion trigger 1" > ~/pikrellcam/www/FIFO" # Report code string "PIR" in motion-events file and use the motion enable currently set. # If there are no other motion direction or burst detects for a motion video, # the web page thumb will be labeled with "PIR". $ A motion still thumb will be labeled with "PIR". echo "motion trigger 0:PIR" > ~/pikrellcam/www/FIFO"
The second usagemotion trigger code pre_capture time_limit is a special case motion trigger event for motion videos (not motion stlls) that records a one shot motion video with a custom pre capture and time limit that overrides the configured motion times. But If this FIFO command is given when there is already a motion video in progress (or if recording motion stills), the custom times are not used. The trigger command then reduces to its first use case as if no custom times were given. For this example, assume that the configured motion enable is either off or, if on, that no other video is in progress. Then issue a motion trigger command that forces motion enable on and records a motion video with a 4 second pre_capture and a 5 second time_limit for a total video length of 9 seconds (subject to the same circular buffer constraints as the record FIFO command):echo "motion trigger 1 4 5" > ~/pikrellcam/www/FIFO" # Report code string "laser" in the motion-events file. # If there are no other motion direction or burst detects for this video, # the web page thumb will be labeled with "laser". echo "motion trigger 1:laser 4 5" > ~/pikrellcam/www/FIFO"
- The fix_thumbs command provides
a consistency check/repair function for video and thumb files. It creates
missing thumbs for motion and manual videos and any motion thumbs will have
"Recovered" text annotated on them to indicate that they are not original
motion area thumbs.
Also thumbs with no video and stray .h264 files will be deleted.
This command exists as a recovery path for- A bug around PiKrellCam 2.0.0: deleting a thumb did not delete its video.
- Before version 2.1.10: there could be stray h264 files if the media file system ran out of space.
- Before version 2.1.9: manual and timelapse videos did not generate thumbs.
echo "fix_thumbs test" > ~/pikrellcam/www/FIFO
echo "fix_thumbs fix" > ~/pikrellcam/www/FIFO
- The annotate_string command dynamically
appends, prepends or removes a string to the date string text drawn on videos.
Here is a demo example script. Copy the text to a file, make the file executable
and run it while watching the OSD (a '_' is the default space character for strings
and in this example adds a space after the hostname and before the temperature):
#!/bin/bash
echo annotate_text_background_color 808080 > ~/pikrellcam/www/FIFO
echo annotate_text_size 42 > ~/pikrellcam/www/FIFO

# use the ds18b20 script if you actually have a ds18b20 connected to your pi.
# TEMP=`read_ds18b20`, otherwise simulate a temperature.
TEMP="29.1C"
echo annotate_string append id1 _$TEMP > ~/pikrellcam/www/FIFO; sleep 3
echo annotate_string prepend id2 ${HOSTNAME}_ > ~/pikrellcam/www/FIFO; sleep 3
TEMP="30.4C"
echo annotate_string append id1 _$TEMP > ~/pikrellcam/www/FIFO; sleep 3
echo annotate_string remove id2 > ~/pikrellcam/www/FIFO; sleep 3
echo annotate_string remove id1 > ~/pikrellcam/www/FIFO

echo annotate_text_background_color none > ~/pikrellcam/www/FIFO
echo inform \"End of annotate_string demo\" 3 3 1 > ~/pikrellcam/www/FIFO
echo inform timeout 3 > ~/pikrellcam/www/FIFO
Multiple scripts may independently display their own data or information strings in the
annotation text as long as they use unique ids.
Command lines in the file have the form:
frequency time "command"
-
frequency - possible values:
daily Mon-Fri Sat-Sun Mon Tue Wed Thu Fri Sat Sun -
time - possible values:
hh:mm start dawn sunrise sunset dusk hour minute 5minute 10minute 15minute 30minuteA minute offset may be added/subracted from the times dawn sunrise sunset dusk.
If the time is start, the command is executed once at startup on the day specified (usually daily) For all other times, the commands execute when the time occurs while PiKrellCam is running. This means if you need an initial setting based on a specific time period (say started during the day versus started at night) when PiKrellCam is started, you need to have your own script that checks the time. Such a script can parse the PiKrellCam state file /run/pikrellcam/state to get the current_minute and compare it to todays sun times from the state file: dawn sunrise sunset dusk. Other values in the state file can be used for special actions in at command scripts.For the sun times to work, edit ~/.pikrellcam/pikrellcam.conf and set the latitude and longitude values to your location. Check the state file or the log file to check the calculated times.
- command - a system command/script or an internal pikrellcam command if the command is preceeded with the '@' character. Commands must be enclosed in quotes.
- Prepend an '!' character to the command if you don't want it logged. See ds18b20.py example below.
C - script commands directory full path
I - the PiKrellCam install directory
a - archive directory full path
m - media directory full path
M - mjpeg file full path
P - command FIFO full path
G - log file full path
H - hostname
E - effective user running PiKrellCam
V - video files directory full path
t - thumb files directory full path
v - last video saved full path filename
S - still files directory full path
s - last still saved full path filename
L - timelapse files directory full path
l - timelapse current series filename format: tl_sssss_%%05d.jpg
    in timelapse sub directory.  If used in any script
    arg list, $l must be the last argument.
T - timelapse video full path filename in video sub directory
N - timelapse sequence last number
D - current_minute dawn sunrise sunset dusk
Z - pikrellcam version
If the command string is an internal @command, only the $H substitution variable is
recognized.
Examples
-
At each PiKrellCam startup
- Goto a preset.
- Prepend the hostname to the annotated text date string drawn on each video
(start1 is just an id string and the '_' character is replaced with a space).
# If no servos, goto position 1 (only 1 position possible with no servos) settings 1:
daily  start  "@preset goto 1 1"
# If servos, goto position 3 settings 1
daily  start  "@preset goto 3 1"
daily  start  "@annotate_string prepend start1 $H_"
-
Turn motion detect off during a time of day when motion videos are not wanted:
Mon-Fri 16:30   "@motion_enable off"
Mon-Fri 18:00   "@motion_enable on"
-
Schedule a timelapse to run Monday through Friday with a period of 60 seconds. Put
it on hold during the night and turn the OSD time lapse display on every morning
and at time lapse end as a reminder the time lapse is running or converting.
Mon      sunrise-5 "@tl_start 60"
Fri      sunset+5  "@tl_end"
Mon-Fri  sunset+5  "@tl_hold on"
Mon-Fri  sunrise-5 "@tl_hold off"
Mon-Fri  sunrise   "@tl_show_status on"
Fri      sunset+5  "@tl_show_status on"
-
Each day at 8:00 AM, archive all videos from yesterday:.
daily 08:00 "@archive_video day yesterday"
Or you could have a custom archive script that does something more complicated like archiving and cleaning out old files. For example, use something like this forum example and have the at-command:daily 23:00 "$C/do-archive"
The do-archive script could be run as an at-command as shown or cron could be used.. -
If you have ds18b20 temperature chips connected, append temperature readings
to the video annotated text date string.
The ds18b20.py script is in the PiKrellCam scripts directory and can be edited
to add labels to temperature values. The 'F' reports fahrenheit. Use
'C' for centigrade.
This example prepends an '!' to the
command to disable logging, otherwise the log file gets spammed every
minute.
daily minute "$C/!ds18b20.py F fifo"
line=`grep motion_enable /run/pikrellcam/state`
motion_state=${line#motion_enable}
The motion_state variable will then be "on" or "off".
When motion_enable is FIFO changed, the new
state should show up in the /run/pikrellcam/state file
within around 100-200 msec.
See the motion_detects_FIFO below if you want to process a continuous stream of motion detects whether or not a motion event is recording.
This file is overwritten with new detect data for each new motion recording and the on_motion_begin command is run immediately after the motion-events file writing begins. The output to the file is flushed after data for each motion detect is written. See script-dist/example-motion-send-alarm2 for an example reading of this file in an on_motion_begin script.
Scripts can determine where motion is in the video frame (by x,y position or motion region number) and then take some action such as sending multicast alarms and/or moving servos.
The format of the file is a header block followed by one or more motion blocks and a final end tag. Inside of motion blocks are the data for each detect during the video.
For example:
<header>
to be documented...
</header>
...
<motion  3.667>
f  49  43  57  -2  57  263
1  44  42  53  -4  53  144
2  55  44  61   0  61  119
</motion>
<motion  4.100>
f  10  36  69  52  86  290
b 949
</motion>
<motion  5.120>
f   0   0   0   0   0    0
e PIR
</motion>
<motion  6.000>
f   0	0   0	0   0	 0
a 45
</motion>
...
<end>
shows data for a first detect at 3.667 seconds into the video (including precapture). Each line inside a motion block begins with a single character code:
- f x y dx dy magnitude count
- where the first character code is 'f'.
This line is the data for the total frame vector (composite of all the motion region vectors). There is always a frame vector reported but may be a zero vector for audio or external only detects. A non-zero frame vector passes the configured magnitude and count limits and there can be a passing frame vector without any passing region vectors. - n x y dx dy magnitude count
- where the first character code n is a digit.
These lines are for motion vectors for a motion region detects. There will be a line for each region having motion and no line for regions not having motion. Just like the overall frame vector, for a motion region to have motion, the configured magnitude and count limits must be met. For this detect there was motion in regions 1 and 2. - b - this line shows burst counts. If no regions individually passed detection magnitude and count limits, the overall frame vector must pass for a burst count detect so a burst detect with no region detects still always has a frame vector.
- a level - shows an audio trigger if an audio level exceeded the configured audio_trigger_level value. If there was only an audio trigger, then the overall motion frame vector 'f' line will show a zero vector.
- e code - shows there was an external trigger (motion trigger command into the FIFO). The code will either be "FIFO" or a custom code supplied in the external trigger command. If there was only an external trigger, then the overall motion frame vector 'f' line will show a zero vector.
This named pipe fifo is for near real time processing of all PiKrellCam motion detects regardless of motion recording enabled state and so can be a general purpose motion detect front end interface for a user application with its own motion detect policy. If motion video recordings are enabled and there is a configured non-zero confirm gap, then this fifo will report motion events that do not trigger a motion video if the second confirming motion detect required for video recordings did not happen.
This fifo is not intended for use by an on_motion_begin command.
See the
To enable or disable writing all motion detects to the motion_detects_FIFO, send to the command FIFO:
echo "motion_detects_fifo_enable [on|off|toggle]" > ~/pikrellcam/www/FIFOMotion detect data blocks are written to the motion_detects_FIFO in the same format as is written into the
If the enable is "on" it will stay enabled across pikrellcam
restarts until an "off" command or pikrellcam.conf is edited. Once enabled,
pikrellcam tries to write all motion detects into the motion_detects_FIFO
and an external app can read the detects from the motion_detects_FIFO.
The external app can be started by hand, by a command in the
at-commands.conf file, or by cron.
When a "motion_detects_fifo_enable off" command is sent to the command FIFO,
an <off> tag is written to the motion_detects_FIFO so the user app can
know the motion_detects_fifo_enable has been turned off.
Read the example script ~/pikrellcam/scripts-dist/example-motion-detects-fifo for more information. If this script is run by hand from a terminal, a stream of all motion detects is printed.
To test the example script on a Pi running pikrellcam, open a terminal
(SSH terminal if the Pi is headless) and run the example script:
    $ ~/pikrellcam/scripts-dist/example-motion-detects-fifo
# The script enables motion_detects_FIFO and motion detects are printed here.
# Terminate the script with ^C or send an off command in another termial:
#    $ echo "motion_detects_fifo_enable off" > ~/pikrellcam/www/FIFO
Commands in at-commands.conf can coordinate times when you want
PiKrellCam to have motion recordings and times when you might want to run
a custom motion detect app that reads from the motion_detects_FIFO.
As is done in the example-motion-detects-fifo script, your app can enable
the motion_detects_FIFO or it can be enabled with an at-commands.conf command
before or after your script starts.
And an at-command can turn the motion_detects_FIFO off at a certain time
if you want to signal your app to self terminate.
Multicasting is a network group communication protocol that uses the UDP transport layer which is inherently unreliable (messages may be lost). To address this, the PiKrellCam multicast implementation provides for message retransmission and tagging messages with id numbers that can be acknowledged so loss detection can be implemented. Using either of these mechanisms is optionally up to the user scripts or programs that implement the PiKrellCam LAN multicast system.
PiKrellCam uses a fixed group network IP and port number for multicast communication which user programs must use:
PKC_MULTICAST_GROUP_IP    225.0.0.55
PKC_MULTICAST_GROUP_PORT  22555
The scripts-dist directory has examples which can be used as is or as a starting point for more complex programs. To use these pkc-xxx programs, copy them to a bin directory on desktops you will run them from and then they can be run from a terminal or script:
-
pkc-motion - turn motion on or off
for one or many PiKrellCams on a LAN.
# Turn off motion detection for all PiKrellCams
pkc-motion all off
# or, "all" is assumed
pkc-motion off

# Turn on motion detection for two cameras
pkc-motion rpi2,rpi4 on
-
pkc-reboot - if reboot/halt is
enabled, reboot a Pi from a LAN desktop terminal.
pkc-reboot rpi1
-
pkc-alarm - This file must be
edited so it can play an audio file on your machine.
Then, if pkc-alarm is running on a desktop,
it will play a sound when it receives a
multicast alarm message from a PiKrellCam on your LAN.
To test playing the audio file, run pkc-alarm in a terminal and then
in another terminal run
scripts-dist/example-motion-send-alarm1. This should work with the terminals on different machines on your LAN. And for further debugging, run pkc-recv in a third terminal.On each Pi you want PiKrellCam to send alarm messages from, the setup is:
- Copy the example-motion-send-alarm1 or example-motion-send-alarm2
from the scripts-dist directory to
scripts/motion-send-alarm. If using the alarm2 example, edit it to select which region you want to detect motion in and edit it to set the motion magnitude and count limits you want.Note: the example-motion-send-alarm2 is likely a work in progress. It is an example of reading the
/run/pikrellcam/motion-events file while a motion video recording is in progress and sending an alarm only if motion exceeding a magnitude and count limit is detected in a particular region. - Edit pikrellcam.conf and set the on_motion_begin command to:
on_motion_begin $C/motion-send-alarm
- Copy the example-motion-send-alarm1 or example-motion-send-alarm2
from the scripts-dist directory to
- pkc-recv - run this in a terminal if you need to debug a PiKrellCam multicasting installation or development. It just prints all the network traffic sent in the PiKrellCam multicast group.
Protocol
from_host to_hosts message_type message_body
- from_host - the hostname of the sending machine. A message id > 0 may be appended to the name after a colon - from_host:id which is used when messages are repeat sent for transmission reliability. Receiving programs should detect if the same id > 0 from the same host is sent multiple times within a second or two and accept only one of the messages. Multiple distinct messages that are sent quickly should have different message ids.
- to_hosts - a single hostname or a comma separated list of hostnames that the message is being sent to. Use the keyword all to send to all programs listening on the PKC multicast group. Every PiKrellCam program is always listening for messages of certain message types addressed to its hostname.
- message_type - a keyword that indicates what is being sent in the message_body. User applications can create their own types and should ignore messages of types they are not interested in. PiKrellcam recognizes receiving message types command and pkc-message and sends a message type ack in response, which is so far not used in any of the example scripts.. The pkc-alarm script recognizes the message type message and that is the type sent by the example_motion_send_alarm scripts.
- message_body - a text string appropriate for and interpreted according to the message type. The message body may contain additional space separated text fields as appropriate for the message type.